|

|
|
|
|
|
|
|
|
|
|
|
|
|
|
|
|
|
|
The first step in setting up your duplicator is to disconnect the carraige lead screw. Under the cross slide are three holes, remove the hex head cap screw from the center hole only. The two outside holes are set at the factory and should not be disturbed. Crank the brass lead screw nut away from the carraige and out of the way of the work area
|
|
|
|
|
|
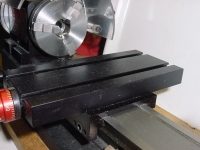
Next; Locate the cross slide evenly on the carraige. The carraige should slide easily (but not loose) using your thumb and forefinger. Adjust the gib if nessessary. A little lite oil on the ways will make a lot of difference here.
|
|
|
|
|
|
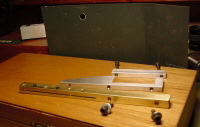
The tailstock template holder is shipped lightly assembled.
|
|
|
|
|
|
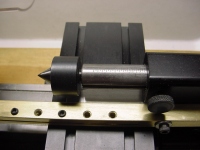
Place the aluminum clamp on the tailstock as shown. Donot tighten clamp screws. Slide the tailstock to the carriage, place a 1/8 inch thick wood or metal shim under the left end of the clamp. Hold down and tighten clamp screws. Remove shim. This will make the templete bar true to the ways.
|
|
|
|
Install your work piece in a manner that will allow the setup to repeat as many times as required If you are using a center in the tailstock, extend it almost as far as it will go. This should allow the carriage to go completly under it
|
|
|
|
|
|
Install the main unit in the right hand slot using the tee nut provided. Set the main body about 1/4 inch from the largest dia. of your template. This will allow you to see the follower and the template at the same time. Set the brass support at about 1/4 inch from the largest dia. of your work piece. Adjust the template in relation to you work piece.
|
|
|
|
|
|
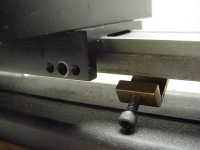
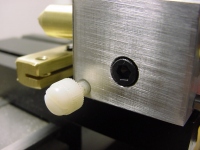
Photo on the right shows the screw used to set the toolbit on center. the white nylon screw sets the tension on the follower and acts as a lock if nessessary.
|
|
|
|
|
|
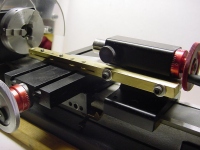
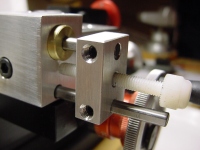
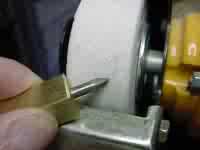
This photo shows the two set screws that are used to set the relationship between the tip of your toolbit and the follower. The white nylon screw is a stop and will control the depth of each cut
|
|
|
|
|
|
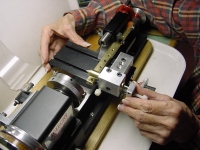
Here we can see the normal operating position of your hands when duplicator is in operation. The right hand moves the carriage and the left moves the toolbit in and out following the template. When using the 3 or 4 jaw chuck to hold your work piece, a stop to prevent the carriage from accidently hitting the chuck is nessessary. Use all normal safety practices when operating this unit.
|
|
|
|
|
|
The brass fixture keeps the flat on the toolbit in the correct relationship to the cutting edges when sharpening the tool bit. May also be used to reshape the follower
|
|
|
|
|
|
The key to making duplicates with this unit is that everything must be free of any binding, a sharp toolbit and some practice on a test piece. Always use the largest radius on the follower tip as your work piece will allow. The follower is soft steel and may reshaped with ordinary tools
|